The MBS-9 microscope is intended for observation of both voluminous objects and thin film and transparent objects, as well as preparation work.
Observation can be carried out both in artificial and natural light in reflected and transmitted light.
Scope: botany, biology, medicine, mineralogy, archaeology, mechanical engineering, instrument making, and other fields of science and technology.
Attention. The design of the microscope may be subject to minor changes that are not taken into account in this passport.
SPECIFICATIONS
- Magnification, fold. … 3.33-100
- Linear field of view, mm ... 39.3 - 2.4
- Microscope working distance, mm … 64
- Light source - lamp 8 V, 20 W
- The light source is powered through a step-down transformer from an alternating current network with a voltage of 220 V, a frequency of 50 Hz.
- Device dimensions in working position (without armrests and illuminator), mm, no more than … 230x190x420.
- Mass of the device, kg, not more than … 7
Information about the content of precious materials
COMPOSITION OF THE PRODUCT AND SUPPLY SET
- Optical head with focus mechanism … 1 pc.
- Eyepiece nozzle … 1 pc.
- Microscope table ... 1 pc.
- Illuminator … 1 pc.
- Cartridge with cord ... 1 pc.
- Power supply … 1 pc.
- Bracket for mounting the illuminator on the optical head of the microscope ... 1 pc.
- Eyepiece 6x … 2 pcs.
- Eyepiece 8x … 2 pcs.
- Eyepiece 14x … 2 pcs.
- Eyepiece 8x with diopter adjustment and scale … 1 pc.
- Armrest … 2 pcs.
- Eyecup … 2 pcs.
- Clamp … 2 pcs.
- Reticle (for 8x eyepiece with diopter adjustment) … 1 pc.
- Glass round plate for preparation … 1 pc.
- Metal plate for preparation … 1 pc.
- Lamp 8 V, 20 W … 3 pcs.
- Flannel napkin … 1 pc.
- Passport … 1 pc.
- Case … 1 pc.
- Packing box … 2 pcs.
Case for spare parts … 1 pc.
OPTICAL SCHEME OF THE MICROSCOPE
The optical scheme of the MBS-9 microscope is shown in fig. 1. When working in transmitted light, the light from the source 1, passing through the condenser 2, frosted glass 3 and reflected from the frosted reflector plate 4, evenly illuminates the preparation placed on the glass slide 5.
The image of the object obtained with the help of objective 6 and two pairs of Galilean systems 7 and 8, the alternate inclusion of which in the path of the rays gives four options for magnification, is focused by an additional objective 9 into the focal plane of the eyepiece 11.
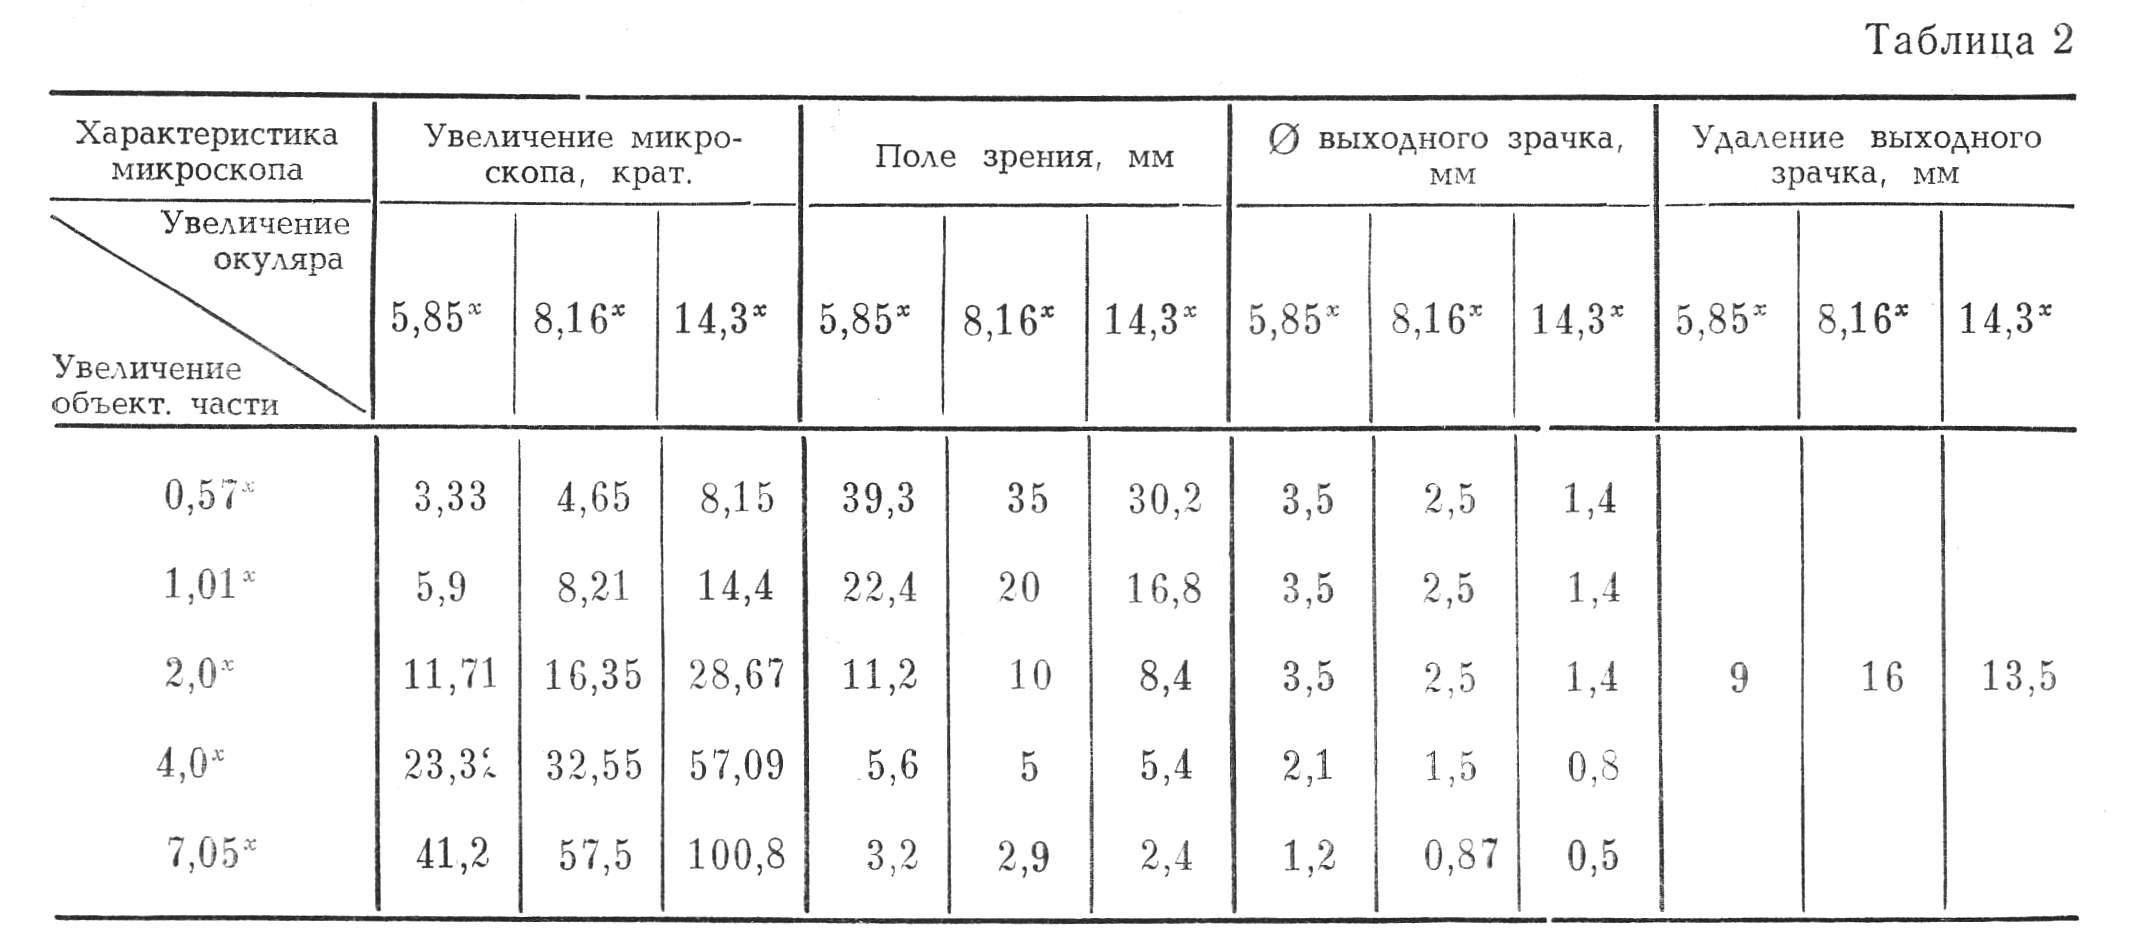
The linear magnifications of the microscope are shown in Table 1.
The microscope comes with three pairs of magnification eyepieces: 6x, 8x, 14x and an 8x eyepiece with diopter adjustment, scale and reticle. Eyepiece bodies are marked with rounded magnification values. With the help of eyepieces, the observer examines the image of the object given by the microscope. The optical characteristics of the microscope with each pair of the listed eyepieces and all magnifications of the objective part of the microscope are shown in Table 2.
![]()
Rice. 1. Optical scheme of the microscope:
1 - electric lamp; 2 - condenser; 3 - frosted glass; 4 - reflector; 5 - glass slide; 6 - main lens; 7, 8 - Galilean systems; 9 - additional lenses; 10 - Schmidt prisms; 11 - eyepieces

Note. All values shown in tables 1 and 2 are rounded.
Schmidt prisms pos. 10 give a direct image of the object and allow you to change the interpupillary distance of the device from 56 to 72 mm in accordance with the base of the observer's eyes.
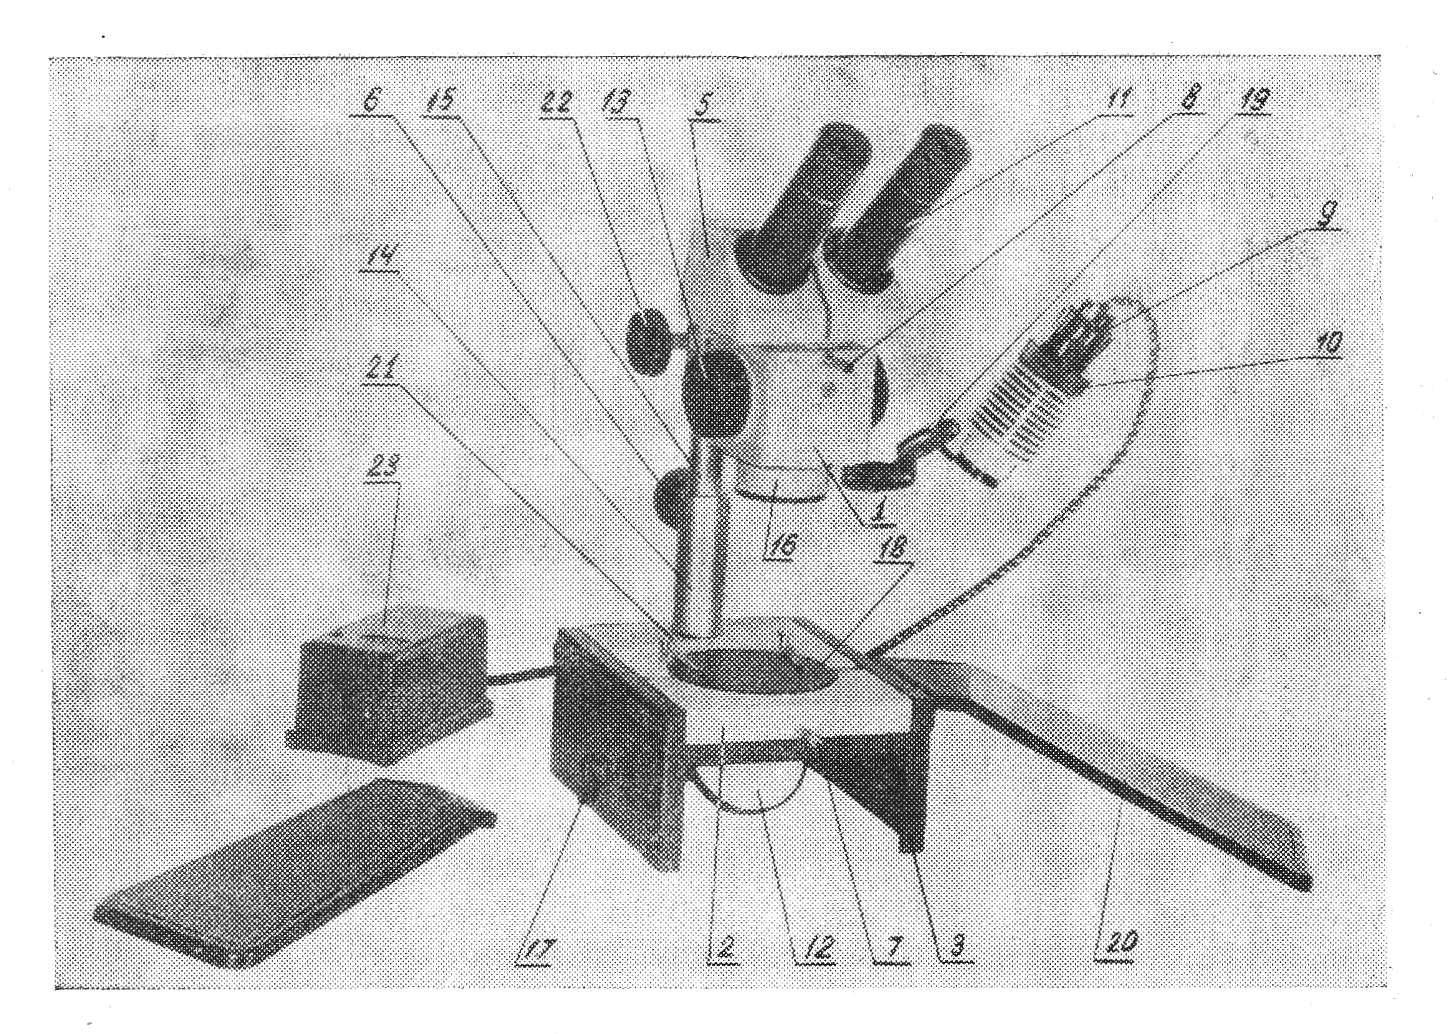
Rice. 2. General view of the microscope
DESIGN DESCRIPTION
A general view of the MBS-9 microscope is shown in fig. 2. The microscope consists of the following main units:
- optical head of the microscope;
- eyepiece;
- microscope table;
- illuminator;
- armrests;
- microscope table base.
The complete set of the microscope is listed in the COMPOSITION OF THE MICROSCOPE AND SUPPLY PACKAGE.
optical head
Optical head 1 (Fig. 2) is the main unit of the device, in which all optical parts are mounted. The main optical assembly is a microscope objective 16 (Fig. 2) with a focal length ƒ′ = 80 mm. It is threaded to the bottom of the optical head housing. A drum with Galileo systems is mounted on bearings above the lens in the housing. The axis of the drum ends with handles 13 (Fig. 2), during the rotation of which the magnifications are switched, the rounded values of which are marked on the handles: 7, 4, 2, 1, 0.6.
To set the desired increase, it is enough, by rotating the drum, to combine the number on the handle with the index printed as a dot on the bearing. Each of the six positions of the drum is fixed by clicking a special spring clip. An eyepiece attachment 5 (Fig. 2), which can be rotated 180° in the horizontal plane, depending on the nature of the work and the lighting used (artificial or natural), is installed in a special socket located on top of the optical head housing. The optical head has a focusing mechanism, which is a rack and pinion. When the handles 22 are rotated, the optical head is raised and lowered relative to the microscope table, which achieves focusing of the device on the object. The course of the focusing mechanism can be changed from easy to tight (or vice versa) by rotating one of the handles 22, while holding the other handle stationary. When examining large, voluminous objects placed on the microscope table, it becomes necessary to additionally raise the optical head. To do this, just unscrew screw 6 (Fig. 2), pull rod 15 out of guide 14 to the desired height and tighten screw 6 again. Care must be taken not to drop the optical head.
Eyepiece attachment
The eyepiece attachment is designed in such a way that it allows you to change the interpupillary distance of the device from 56 mm to 72 mm in accordance with the base of the observer's eyes.
It consists of a guide, in which the left and right frames of the lens 9 (Fig. 1) are eliminated with prisms 10 fixed on their upper plane (Fig. 1) in the frame. Ocular tubes 11 (Fig. 2) are attached to the frames of the prisms, and it is strictly forbidden to unscrew them. From above, the prisms are closed by two cases. The frames of the lenses, together with the prisms mounted on them, can be rotated in the guide. From below, two gears are attached to the lens frames with screws, which are always engaged, due to which the prisms rotate at the same angles. When installing the eyecup, it is allowed to bend the antennae of the slot of the eyecup frame.
Attention. When changing the interpupillary distance of the device, rotating the prisms together with the lens frames, you should hold on to the bodies of the prisms, and not to the eyepiece tubes.
Microscope table and table base
On the microscope table 2 (Fig. 2) in the guide 14, with the help of a screw 6, the optical head of the microscope is attached. Screw 6 must be well tightened during operation. In the upper wall of the table there is a round window into which the preparation plate is installed, two holes for clamps 21 and three holes for installation, which is not included in the device, but is purchased separately.
Table 2 is mounted on the base of table 3 and fixed with screw 7, which must face the front, open side of the table base. Screw 7 must always be tightened to prevent the microscope from falling. At the base of the table there is a swivel mirror 12 with a rotation handle 17. In the back wall of the table base there is a socket with a clamping screw for fixing the illuminator, on the side walls there are four sockets for installing armrests, a reflector is mounted inside the table base.
Illuminator
The illuminator can be used in both transmitted and reflected light. It consists of a condenser and an incandescent lamp with a cartridge, united by a common body. The incandescent lamp is powered from the 220 V alternating current mains through the power supply unit 23, which is included with the microscope.
To ensure uniform illumination of the object, the design of the illuminator provides for the adjustment movement of the lamp relative to the condenser. To adjust the illumination, you need to install the illuminator in the body of the microscope table and direct the light beam onto the matte plate. After that, slightly unscrew the nut 10. Then, holding the sleeve 9, carefully move the lamp relative to the condenser, achieving uniform illumination of the field of view, observing through the right and left eyepieces. In addition, the illumination can be adjusted by moving the lamp relative to the condenser in the axial direction.
At the smallest magnification given by the microscope (3.5x), you can use the illuminator without a condenser. To do this, it is enough to remove the lamp with a cartridge from the seat in the illuminator body and insert it into the seat in the table body. In this case, adjust the illumination by moving the lamp with the cartridge in the socket along the axis, rotating around its axis or by turning the handle of the power supply rheostat.
In order to use the illuminator when working in reflected light, it should be mounted on a hinged bracket 19. To obtain more uniform illumination, frosted glass, which is included in the microscope kit, is installed in front of the condenser.
Lamp change:
The microscope comes with two spare lamps. When changing a burnt-out lamp, it is necessary to remove the cartridge with the burnt-out lamp from the illuminator, replace the lamp with a suitable one, then install it in its original place and adjust the illumination, as indicated earlier. During prolonged operation, the illuminator must be periodically turned off.
armrests
With long-term observations, fairly rapid fatigue of the hands occurs. To ensure their comfortable position during work, the set of accessories for the MBS-9 microscope includes two plastic armrests 20, which can be easily installed on the table base and can also be easily removed.
For fixing the armrests on the side walls of the table base, special nests are provided, two on each side.
The armrests can be set in two positions depending on the position of the eyepiece.
SAFETY INSTRUCTIONS
The device is designed to work indoors without increased electrical hazard.
High risk conditions are:
- increased humidity and dustiness of the air;
- conductive floors of metal, earthen, brick, reinforced concrete;
- temperature above 40°C.
Regularly check the integrity of the cord insulation before connecting the appliance to the mains.
PREPARING THE PRODUCT FOR WORK
Unpack the microscope MBS-9, brought into a warm room from the cold, should be only after six hours. Unpack the device and put it into working condition.
For this you need:
- connect the eyepiece attachment 5 with the optical head of the microscope 1 and tighten the screw 8 until it stops;
- install the optical head in the guide 14 of the microscope table and fix it with screw 6. At the same time, it is necessary to ensure that the optical axis of the microscope head coincides with the center of the table window, otherwise uneven illumination across the field may be observed;
- connect the illuminator to the network through the power supply supplied with the device;
- adjust the illumination as described earlier in the subsection Illuminator.
OPERATING PROCEDURE
As mentioned above, the device can operate in various modes of illumination of the observed object.
Depending on the light source:
- in natural light;
- under artificial lighting.
Depending on the type of object:
- in reflected light;
- in transmitted light.
Work under artificial lighting.
Under artificial illumination, the light from an incandescent electric lamp, passing through the condenser, falls (in the case of operation in reflected light) directly onto the object. In this case, the illuminator is fixed on a hinged bracket. When working in transmitted light, the illuminator is mounted in a special socket on the rear wall of the microscope table base. Uniform illumination across the field is achieved by turning the handle 17.
Attention. The illuminator is connected to the network only through the power supply unit supplied with the device.
Work in natural light.
To work in natural light, you need to do the following. Unscrew screw 8 (Fig. 2), then, slightly lifting the eyepiece and holding it by the body, turn it 180° so that the fixing screw enters the groove in the device body. Then tighten screw 8 until it stops. The armrests also need to be rearranged. The MBS-9 microscope is positioned with a tripod towards the observer, and the release, available in the table body, towards the window. The light from the window, passing through the release, falls on the lighting mirror (or matte plate) and, reflected from it, illuminates the object from below.
Examination of the surface of large objects.
If it is required to examine the planes of large objects (sheets of metal, glass, etc.), it is necessary to unscrew screw 7 (Fig. 2), remove the microscope with the table from the table base and install it directly on the surface of the object under study. The glass slide or metal plate must first be asleep.
Working with an eyepiece with interchangeable scale and reticle.
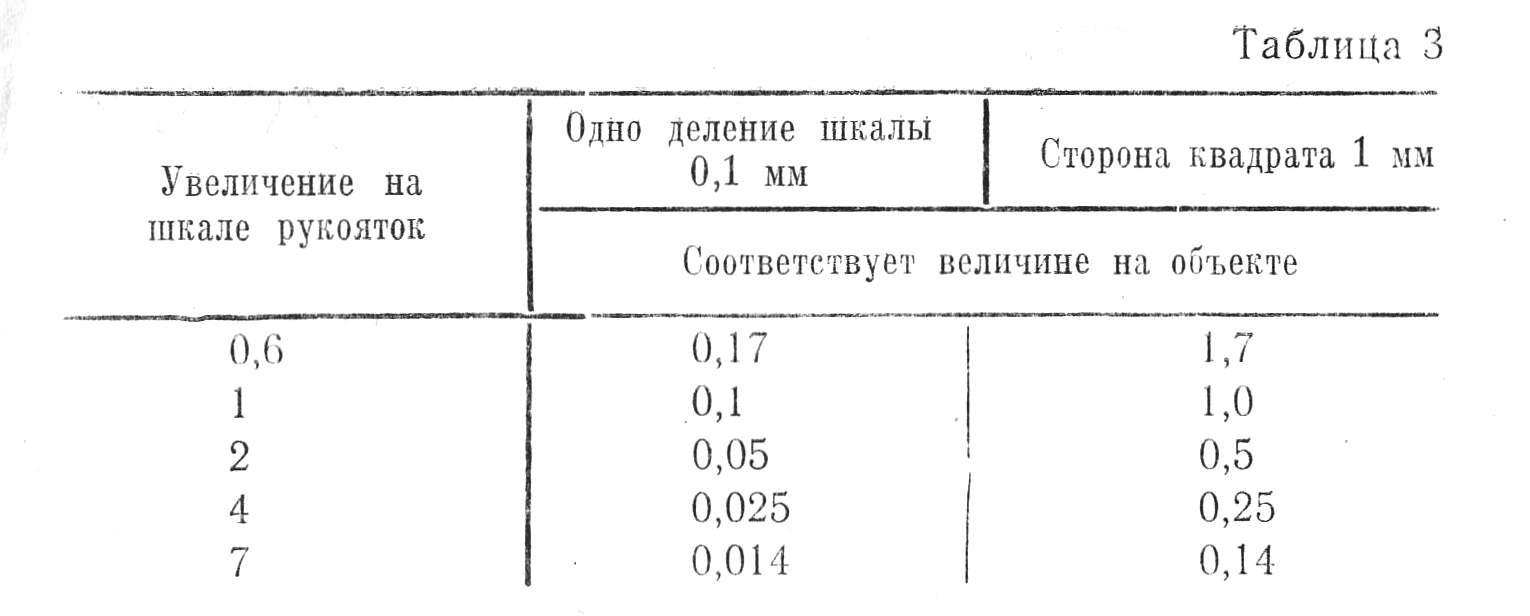
For an approximate assessment of the linear dimensions or areas of the object of observation, you should use an 8x eyepiece with a diopter adjustment with an interchangeable scale (or grid), which is included with the microscope. Insert the eyepiece into one of the eyepiece tubes of the microscope, rotating the diopter ring, to achieve a sharp image of the scale or grid, depending on what is installed. Then turn the handles of the microscope focusing mechanism to achieve a sharp image of the object. Below is a conversion table 3, which indicates what size of the object corresponds to one division of the scale or grid at all magnifications of the objective part of the microscope. To determine the dimensions of an object (its linear dimensions or area), it is enough to count the number of scale divisions that fit into the measured area of the object, and multiply this number by the number indicated in the conversion table, corresponding to the magnification of the microscope at which the measurement is made. The scale and grid are glass plane-parallel round plates. The scale division is 0.1 mm. The price of dividing the side of the grid square is 1 mm.
The scale is inserted into the frame of the eyepiece 8x with diopter adjustment, the grid is attached to the microscope. To change the scale to a grid, you need to do the following:
- unscrew the scale frame from the eyepiece body, which is located in its lower part;
- unscrew the nut securing the scale (or grid), and carefully remove the scale from the frame. Replace it with a grid;
- tighten the nut;
- screw the frame into the eyepiece body.
MAINTENANCE
Upon receipt of the microscope, you should pay attention to the safety of the manufacturer's seal.
The microscope leaves the factory carefully tested and can work flawlessly for a long time, but for this it is necessary to keep it clean and protect it from mechanical damage. The factory packaging ensures the safety of the microscope during its transportation.
During non-working hours, cover the microscope with a cover.
If after some time the lubricant in the guides of the microscope focusing mechanism becomes very dirty and thick, then, after washing it off with xylene or gasoline and wiping the rubbing surfaces with a clean cloth, you should lightly lubricate the guides with acid-free vaseline or special grease.
Liquid that gets on the microscope during operation must be carefully removed.
Particular attention should be paid to the cleanliness of the optical parts of the microscope. To protect the prisms from dust settling on their surfaces, you should always leave the eyepieces in the eyepiece tubes of the microscope. Eyepieces must also be protected from dust.
Never touch the surfaces of optical parts with your fingers to avoid contamination.
When cleaning the outer surfaces of the lenses, remove dust from them with a soft cloth. If, after removing the dust with a cloth, the surfaces of the optical parts remain insufficiently clean, then they must be wiped with a soft, washed many times linen or cambric cloth, slightly moistened with aviation gasoline or acetone.
CERTIFICATE OF ACCEPTANCE
The stereoscopic microscope MBS-9 serial number ___________ complies with the technical specifications TU3-3.1210-78 and is recognized as fit for use.
OTK representative _______________
WARRANTY
The manufacturer guarantees the compliance of the stereoscopic microscope MBS-9 with the requirements of the technical specifications, provided that the consumer observes the conditions of operation, transportation and storage established by the technical conditions and operating rules set forth in this passport.
The warranty period is set to 2 years from the date of putting the product into operation, but not more than two and a half years from the date of shipment of the product from the manufacturer's warehouse.
PRESERVATION AND PACKAGING DETAILS
The stereoscopic microscope MBS-9 serial number __________ is subjected to conservation and packaging at the factory in accordance with the requirements stipulated by the operating rules.
Date of conservation and packaging _______________
Preservation and packaging made by ____________________